Christmas Craft Activities
Guest post by Jade Waddy It’s that time of year again where we start thinking about that one day of the year we can all celebrate and enjoy. Christmas is a wondrous time, especially for those know are slightly newer to the world. Getting your toddler into the Christmas spirit isn’t easy, but you can use fun crafts to keep them amused and entertained. Here are a handful of crafty ideas to help your toddlers get into some festive fun:
Making Your Own Christmas Tree
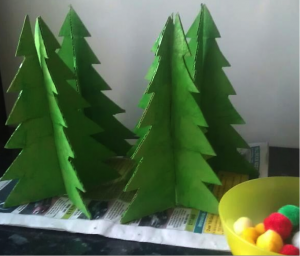
First things first, it wouldn’t be Christmas without the all-important tree. Your little ones can very easily make their very own tree that they can decorate in whichever way they like. You can use thick paper or card to make several types of tree, the most common being a 3D tree. How to make a 3D Tree:
- Use 2 identical bits of paper/card which are the same width you wish the tree to be.
- Fold them in half together and draw half a tree vertically on the paper then use that guideline to cut the paper, which should leave you with 2 identical trees.
- To create the 3D effect you need to make a cut at the top of one tree and the bottom of the other. Make sure the slit only goes halfway up or down the tree.
- Decorate with glitter or sequins, whatever tickles the fancy of your little terror!
[caption id="attachment_486" align="aligncenter" width="500"] 3D Christmas Trees[/caption] Photo credit: odlingspyssel
Creating Curious Tree Decorations
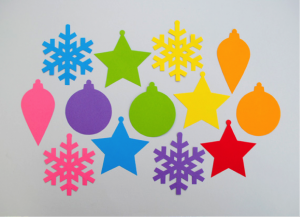
Once you’ve taught your toddler about the ways of the Christmas tree, you can move onto the decorations for your main tree. You can create decorations either with bits of card, by playing with clay or by using fabrics to sew together something. Obviously this will all depend on how old the child is, when they’re very young you can only really stick to the card to be safe. Toddlers can handle clays and create little masterpieces, however only slightly older children will be safe to use needles for sewing. You can compromise by using glues to stick fabric together, however this doesn’t work as well (especially on fabrics such as felt). How To Use Old Christmas Cards As Tree Decorations:
- Find a box of old Christmas cards or buy some budget ones on the high street.
- Make sure to have some spare card ready in various colours.
- Start with a blank canvas with some of the plain card and shape into something festive such as stars or baubles.
- Get the little ones to cut out images from Christmas cards, remember scissor safety!
- Once they’ve cut out their favourite pictures, have them make a mini collage on their plank paper using PVA glue to stick them down.
- Once you have your piece of art for the tree, make a small hole in the top and add a 15 cm length piece of string or ribbon to use as a loop then add it to your tree.
 Homemade Christmas tree decorations[/caption] Photo credit: Minico
Festive Family Christmas Cards
Now your home is fully decorated you can move into spreading the Christmas cheer to your friends and family. Christmas cards are an absolute must, it’s a great way to teach your children about their other family members and give them the opportunity to write. You can either make a card from scratch and have your little one make Christmas drawings on the front whilst you sign the inside or alternatively you can order a personalised card with maybe a family photo on it and have your toddler sign the card themselves on the inside and then help you to put them in envelopes and put stamps on them. It might sound boring to get them doing long repetitive tasks like this but it can really help to build up their cognitive development. It also gives you a moment or two to relax! How To Make A Festive Card:
- Make sure you have lots of coloured card, various types of pens, glitter and bits and bobs to stick down.
- Start with an A5 piece of card and fold it perfectly in half, then decide which way around you wish the card to be. This can either be plain white or coloured card.
- Decide on whether you want to just draw on the card or stick bits to it, if you’re drawing on it then go crazy. Otherwise, use other bits of card to make festive shapes ready to stick down.
- Gather all your bits of card cut-outs and stick them fashionably across the initial piece of card. Add sequins or glitter etc to top it all off.
- Remember to sign the card before you give it away!
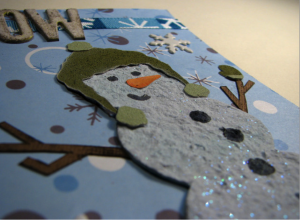
 Festive Christmas Snowman Card[/caption] Photo credit: On The Wright
Ready, Steady, Bake!
The final step of celebrating Christmas with your little one is to get baking! You can choose to make simple sponge cakes or you can create an awesome gingerbread house with them. You can get them to add in ingredients to the bowl before you mix it, you can also get them to help more with the decorating afterwards. This is something to be done only a few days before Christmas day itself so that whatever you and your child makes can last through the end of December. Gingerbread houses and gingerbread men tend to be the more popular choice as they’re much easier to decorate and are hardy. You can even turn them into tree decorations! Butterfly cakes are also a popular choice as they are light and fluffy and extremely easy to make. How To Make Gingerbread Men:
- For this you will need: 350g plain flour (plus a handful for shaping), 2 tsp ground ginger, 1tsp cinnamon, 125g butter, 175g brown sugar, 1 medium sized egg and 4 tsp golden syrup.
- Start by putting the flour, ginger and cinnamon in a bowl or processor and slowly add in the butter until the mixture looks like breadcrumbs. Then add in the sugar.
- In a separate bowl, lightly beat the egg and golden syrup then add to the rest of the mixture. Blend together until one solid lump.
- Remove from bowl and briefly kneed the mixture until smooth then wrap up in cling film and leave in the fridge to chill for 15 minutes.
- Preheat the oven to 180C/Gas Mark 4 and line 2 baking trays with greaseproof paper.
- Roll out the dough until it has a thickness of 0.5cm on a lightly floured surface. Use shaped cutter to make men or stars etc and place each shaped piece of gingerbread on the greaseproof paper, leaving space between each shape.
- Bake in the oven for 12-15 minutes or until golden brown. Leave to cool for 10 minutes before moving them onto a wire rack for a further 30 minutes. Once cooled decorate with icing.
 Gingerbread shapes - a twist on the tradition 'man'[/caption] Photo credit: Dixie and Dottie
Author Bio: Jade Waddy is an experienced writer with an NOCN level 3 in journalism. She writes on all manner of subjects but specialises in seasonal posts and works on behalf of Christmas Photo Cards.